APIPA (Automatic Private IP Addressing)

With APIPA, DHCP clients can automatically self-configure an IP address and subnet mask when a DHCP server isn’t available. When a DHCP clients boots up, it first looks for a DHCP server in order to obtain an IP address and subnet mask.

If the client is unable to find the information, it uses a APIPA to automatically configure itself with an IP address from a range that has been reserved especially for Microsoft. The IP address range is 169.254.0.1 through 169.254.255.254. The client also configures itself with a default class B subnet mask of 255.255.0.0. A client uses the self-configured IP address until a DHCP server becomes available.

The APIPA service also checks regularly for the presence of a DHCP server (every five mins, according to Microsoft). If it detects a DHCP Sever on the network, APIPA stops, and the DHCP server replace the APIPA networking addreses with dynamically assigned addresses.

APIPA

This is by the this link : http://www.webopedia.com/TERM/A/APIPA.html
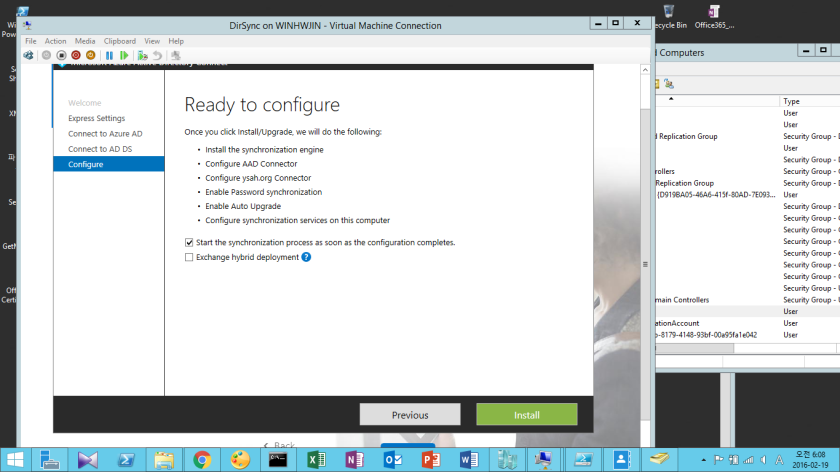
DNS Records for Office 365

For setup office 365 environments and services need various kinds of dns records. I’ll explain as basic dns records to setup at first.

If your custom DNS zone is hosted by GoDaddy, Office 365 can configure the appropriate DNS records for you automatically, but is hosted by another DNS hosting provider, we have to configure DNS records as manually. In my case if I bought my custom domain, I don’t know GoDaddy, but after expires of my custom domain, I’ll buy it through GoDaddy. [I’m not related to GoDaddy]

  1. Autodiscover CNAME record for Autodiscover service.
  2. MX record for mail routing
  3. Sender Policy Framework  (SPF) record to verify identity of mail server.
  4. TXT record for Exchange federation
  5. CNAME record for Exchnge federation

Autodiscover CNAME record : Need to create a CNAME record that uses the alias Autodiscover to point to the hostname Autodiscover.outlook.com , so that Outlook clients have their settings automatically provisioned for Office 365.

MX record : Point to an Office 365 target mail server as in the form <mx token>.mail.protection.outlook.com , it needs to set mx priority value than any other MX records.

SPF record :  Sender Protection Framework (SPF) record is a special TXT record that reduces the possibility of malicious third parties using custom domainto send spam or malicious email. which email servers are authorized to send messages on behalf of the custom domain. It must be TXT record that must include v=spf1 include:spf.protection.outlook.com -all , set TTL value to 3600.

Exchange federation TXT records : To federation between on-premise exchange server and Office 365 for Exchange online, first is the hash text, second record have exchangedelegation

Exchange federation CNAME record :  To federation with Office 365 , CNAME record will have alias as the autodiscover.service  point to autodiscover.outlook.com

Skype for Business Online DNS records : Needs to two types of DNS records if you have a custom domain. Two srv records and two CNAME records to get Skype for Business working properly.

  • Skype for Business Online SRV records (flow of data between Skype for Business client)
    1. Service: _sip , Protocol: _TCP, Priority: 100, Weight:1, Port:443, Target:sipdir.online.lync.com , DNS manager => Forward Lookup Zones => Domain => _tcp => check _sip service Location (SRV)
    2. Service : _sipfederationls, Protocol: _TCP, ~~ Port : 5061, Target : sipfed.online.lync.com
  • Skype for Business Online CNAME records :
    1. CNAME record uses the alias “sip” and points to sipdir.online.lync.com [allows the client to find the Skype for Business service and assists in the process of signning in]
    2. CNAME record assists the Skype for Business mobile device client to find the Skype for Business service and also assists with sign-in, this record is lyncdiscover and the record target is webdir.online.lync.com

SharePoint Online DNS records : Needs to update SPF record , it include the text include:sharepointonline.com

There are MDM CNAME record such as  below

  1. MDM Enterpriseregistration (enterpriseregistration / enterpriseregistration.windows.net) : MDM Enterpriseregistration
  2. MDM Enterpriseenrollment (enterpriseenrollment / enterpriseenrollment.manage.microsoft.com) : MDM Enterpriseenrollment

I remembered if I heard this record during project , it feeled unfamiliar, but now it is more better than some monthes ago,


Exchange Server 2013 Setup prompts error

If I setup exchange server 2013 on VM on windows server 2012 R2 , it prompts error below , like Mailbox role: Transport service, so I will reference it this document, it explain needs to remove and reboot then remove ad users related to exchange on active directory, then rein stall it. I’ll try it whether resolve or not.

https://kickthatcomputer.wordpress.com/2013/02/28/exchange-server-2013-setup-fails-creating-mailbox-role/

error

Active Directory synchronization 구성하기

안녕하세요. Office 365 구성을 할 때, OnPremise Server AD를 기준으로 하여,  OnPremise AD User 등을 Office 365 Azure Directory에 동기화를 하여 구성을 할 수 있습니다.

구성을 하기 위해서는 Office 365 Admin Portal에서 Users => Activate Users로 이동하여 , Active Directory synchronization의 Setup을 클릭하면, [저의 경우는 이미 구성을 하여서, Manage 항목이 보이지만, 처음 구성의 경우, Set up 이라는 항목이 보입니다.]

ADSync_Enable 구성을 할 수 있습니다.

OnPremise AD와 Cloud AD를 원격으로 구성하기 위해서는 OnPremise의 EnterPrise Admin 계정의 정보[Active Directory Domain Service와 연결시 필요]와 Office 365 Global Admin [Azure AD 연결시]계정 정보가 필요합니다.  Windows Server 2012 R2 Evaluation version VM에 설치를 하였으며,

DirSync를 설치하여 구성을 하려고 Forefront  Identity Management , SQL 2008 구성 요소, SQL Server 등이 필요 했는데, Office 365 Admin Portal에서 Active Directory synchronization Setup을 하면 , Azure AD Connect를 설치하면, SQL Server component등을 모두 다운 받아, 굳이 따로 준비하지 않아도 될 만큼, 설치가 가능하다.

이미지 1.png

synchronization engine을 설치, Azure Active Directory Connector를 구성, 도메인 connector를 구성, Password Synchronization도 구성하게 되며, Auto Upgrade 및 컴퓨터에 설치된Synchronization serives를 위하여 Full Sync 등을 할 수 있다. 이미지 7.png

Azure AD Connect가 설치된 PC에서 Synchronization serivces를 실행하여, Full Sync를 하면,  OnPremise AD의 계정들이 모두 동기화 되어, 보여진다.

AfterFullSyncToCloud

DirSync 또는 AAD Connect를 위한 OnPremise AD Synchronization은 생각보다는 작동의 원리 등을 이해하면, 쉽게 구성이 가능합니다.  지금 하고 있는 것 중에 하나는 OnPremise Exchange Server Mailbox를 Cloud에 등록하는 것도 진행을 해보려고 합니다.  그리고 다시 ADFS도 마저 구성을 해봐야 할 것 같네요.. 최근에 구매한 공인된 SSL, Domain 등을 이용하여 구성을 하다보면, Office 365 Admin으로서 알아가야 할 내용 등에 조금더 다가갈 수 있다고 생각합니다.

Office 365 Role

Office 365 Role을 살펴보면,

Global Administrator , Billing administrator, Exchange administrator, Password administrator, Skype for Business administrator, Service administrator, Sharepoint administrator, User management administrator가 존재합니다.

Global Administrator는  Office 365 Tenant를 생성하면, 생성자에게 Global Administrator 권한이 부여됨. Exchange, SharePoint, Lync 등의 Full 권한을 가지고 있음. Admin Center안에 있는 모든 권한을 갖고 있음.

Global Administrator이 갖고 있는 Permissions은 아래와 같습니다.

  1. View Org and User Info
  2. Manage Support Tickets
  3. Reset User Passwords
  4. Perform billing and purchasing
  5. Create and Manage user views
  6. Create Edit and Delete Users, Groups
  7. Manage Licenses
  8. Manage Domain
  9. Delegate Admin Roles
  10. User Directory Synchronization

Billing Administrator는 아래의 권한을 갖고 있다.

  1. View Org and User Info
  2. Manage Support Tickets
  3. Perform billing and purchasing

그렇다고 Exchange, SharePoint, Lync 등의 권한을 갖고 있지 않다. Office 365 Administration Center를 보면, Users, Groups 어디에도 추가할 수 있는 권한을 갖고 있지 않으며, Purchase Services로 이동하여, Buy now를 하여, Office 365 라이선스 구매가 가능하다.

billingadmin

User Management Administrator

User Management Administrator는 View Org and User Info, Manage Support Tickets, Reset User Passwords (Non Admins only), Create and Manage user view, Create Edit and Delete Users, Groups (Non Admins only)의 권한을 갖고 있다. Billing Administrator의 Office 365 Admin page의 경우, 비슷한 화면을 보여지지만, Users , Groups 등을 펼쳐보면, 계정 생성 및 그룹 생성이 가능하다. DirSync and ADFS를 사용하는 경우에는 User Management가 의미가 없다. 모든 정보가 Internal에서 External로 Replicate 되기 때문에, User Management는 Cloud Base기반에서는 활용 가능성이 높다.

Service and Password Administrators

View Org and User Info, Manage Support Tickets, Reset Users Password (Non Admins only)의 권한을 갖고 있다.

Service Administrator Permissions

View Org and User Info , Manage Support Tickets 권한을 갖고 있다.

모든 내용은 아래 그림을 보면, 좀 더 쉽게 이해가 가능하다.

ReviewOfRoles.png


Office 365 Custom Domain 제거

Office 365 Custom Domain 구성 후, Domain 정보를 제거하기 위해서는, 이전에 생성한 Domain이 들어간 모든 정보를 삭제를 먼저 해야 합니다. 저의 경우는 Trial Office 365 Licenses를 가지고 하였기 때문에, 1달 이후에는 계정이 만료되는 문제점이 있기 때문에, Azure Powershell만 연결할 수만 있어도 전역 관리자이기 때문에, 모든 작업이 가능하기 때문에,  SharePoint, Exchange Email Users, Groups 등을 모두 정리해야 합니다.

Domain을 ysah.org로 가정 했을 때.

  1. 해당 Custom Domain 관련 AD가 아래와 같이 확인되는 것을 확인 get-msoluser -DomainName ysah.org
  2. 휴지통으로 이동된 AD 계정을 정리하기 위하여 휴지통으로 이동된 정보 확인                      get-msoluser -ReturnDeletedUsers -DomainName ysah.org
  3. 아래 명령어를 이용하여 ysah.org 도메인을 값으로 갖는 AD 내 사용자 정보 영구 삭제  get-msoluser -ReturnDeletedUsers -DomainName ysah.org | Remove-MsolUser -RemoveRecyleBin -Verbose
  4. Get-MsolDomain 을 이용하여 현재 구성되어진 Domain 정보 확인
  5. Remove-MsolDomain -DomainName ysah.org -Verbose 를 한 이후에 “Yes”를 클릭 후에 Domain을 영구적으로 삭제


Office365_Custom Domain 제거가 않될때

안녕하세요.

Office 365에서 내가 소유하고 있는 도메인(ysah.org)을 PowerShell로 제거를 하려고 할 때, Remove-MsolDomain -DomainName ysah.org -Verbose를 실행 했을 때 RemoveDomainError_PS

Remove-MsolDomain : Unable to remove this domain. Use Get-MsolUser -DomainName <domain name> to retrieve a list of objects that are blocking removal. Error가 뜨는 경우 , https://support.microsoft.com/en-us/kb/2787210 의 “Unable to remove this domain” error when you try to remove a domain from Office 365 문서를 활용하자. 나의 경우는 get-recipient | where {$_.EmailAddresses -match “ysah.org”} | fl Name, RecipientType, EmailAddresses 를 한 이후에, smtp 주소에 기록이 남아 있었다.

get_recipient_domain

나의 경우는 Office 365 Admin의 Profile의 Alternative email address에 위 도메인으로 시작하는 주소가 남아 있어서, 삭제가 되지 않았다. Profile => Email address => Other email address 에서RemoveOtherEmailAddr_profileDelete를 한 이후에  , PowerShell에서 Remove-MsolDomain -DomainName ysah.org -Verbose 를 한 이후에, Custom Domain 이 정상적으로 제거가 되었다.


텐서 플로우 블로그 (Tensor ≈ Blog)

머신러닝(Machine Learning), 딥러닝(Deep Learning) 그리고 텐서(Tensor) 또 파이썬(Python)

Jaap Wesselius

Microsoft UC Specialist

Office365 Cloud for My site

Office365 & SharePoint & PowerShell