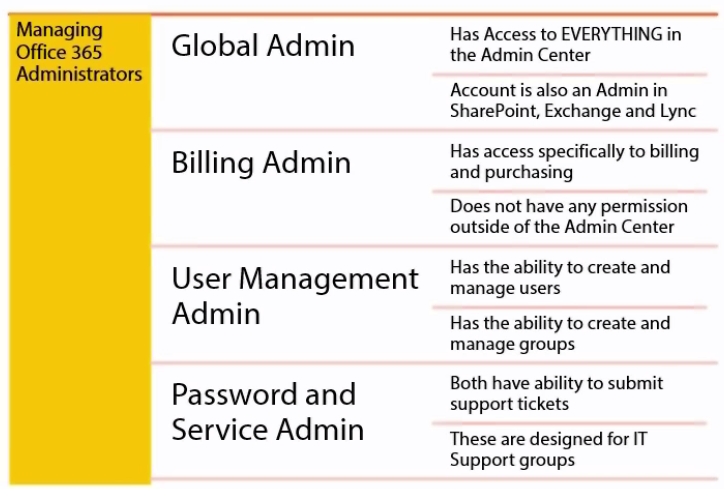
Office 365 Role을 살펴보면,
Global Administrator , Billing administrator, Exchange administrator, Password administrator, Skype for Business administrator, Service administrator, Sharepoint administrator, User management administrator가 존재합니다.
Global Administrator는 Office 365 Tenant를 생성하면, 생성자에게 Global Administrator 권한이 부여됨. Exchange, SharePoint, Lync 등의 Full 권한을 가지고 있음. Admin Center안에 있는 모든 권한을 갖고 있음.
Global Administrator이 갖고 있는 Permissions은 아래와 같습니다.
- View Org and User Info
- Manage Support Tickets
- Reset User Passwords
- Perform billing and purchasing
- Create and Manage user views
- Create Edit and Delete Users, Groups
- Manage Licenses
- Manage Domain
- Delegate Admin Roles
- User Directory Synchronization
Billing Administrator는 아래의 권한을 갖고 있다.
- View Org and User Info
- Manage Support Tickets
- Perform billing and purchasing
그렇다고 Exchange, SharePoint, Lync 등의 권한을 갖고 있지 않다. Office 365 Administration Center를 보면, Users, Groups 어디에도 추가할 수 있는 권한을 갖고 있지 않으며, Purchase Services로 이동하여, Buy now를 하여, Office 365 라이선스 구매가 가능하다.

User Management Administrator
User Management Administrator는 View Org and User Info, Manage Support Tickets, Reset User Passwords (Non Admins only), Create and Manage user view, Create Edit and Delete Users, Groups (Non Admins only)의 권한을 갖고 있다. Billing Administrator의 Office 365 Admin page의 경우, 비슷한 화면을 보여지지만, Users , Groups 등을 펼쳐보면, 계정 생성 및 그룹 생성이 가능하다. DirSync and ADFS를 사용하는 경우에는 User Management가 의미가 없다. 모든 정보가 Internal에서 External로 Replicate 되기 때문에, User Management는 Cloud Base기반에서는 활용 가능성이 높다.
Service and Password Administrators
View Org and User Info, Manage Support Tickets, Reset Users Password (Non Admins only)의 권한을 갖고 있다.
Service Administrator Permissions
View Org and User Info , Manage Support Tickets 권한을 갖고 있다.
모든 내용은 아래 그림을 보면, 좀 더 쉽게 이해가 가능하다.


 Above this Service status said , Exchange_S_STANDARD is PendingInput , it means if you start outlook under OWA, you can see below message “Error: You cannot open mailbox, it may the mailbox license was expired, so if you check how to get access authority of this mailbox, you ask your mail administrator”
  If it takes time , when you check service status, you can see most of services are success to open it.
 , I made batch file using setup.exe /configure configuration.xml , then I distributed to our network folder to users.


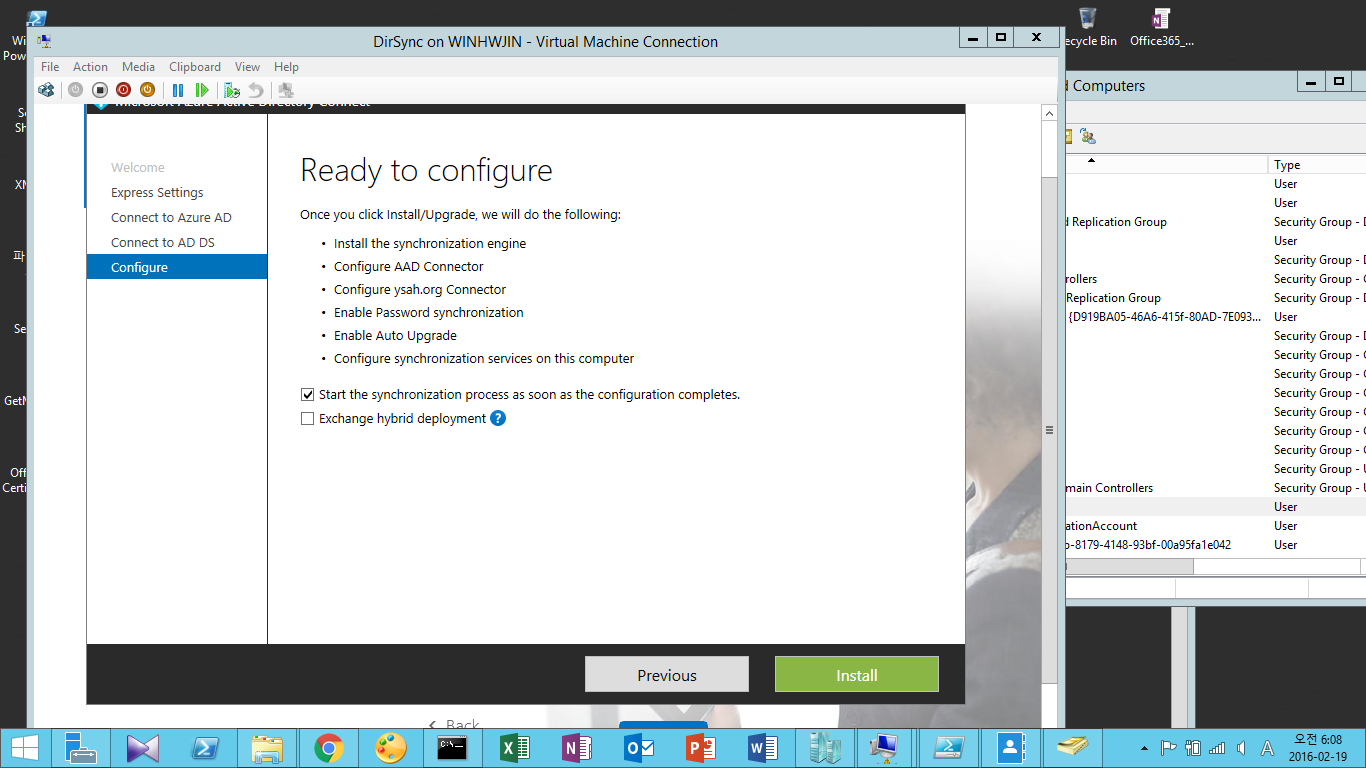
 구성을 할 수 있습니다.